Front Surfing Your Canoe

Front Surfing Your Canoe

With these tips, surfing your canoe may be easier than you think.

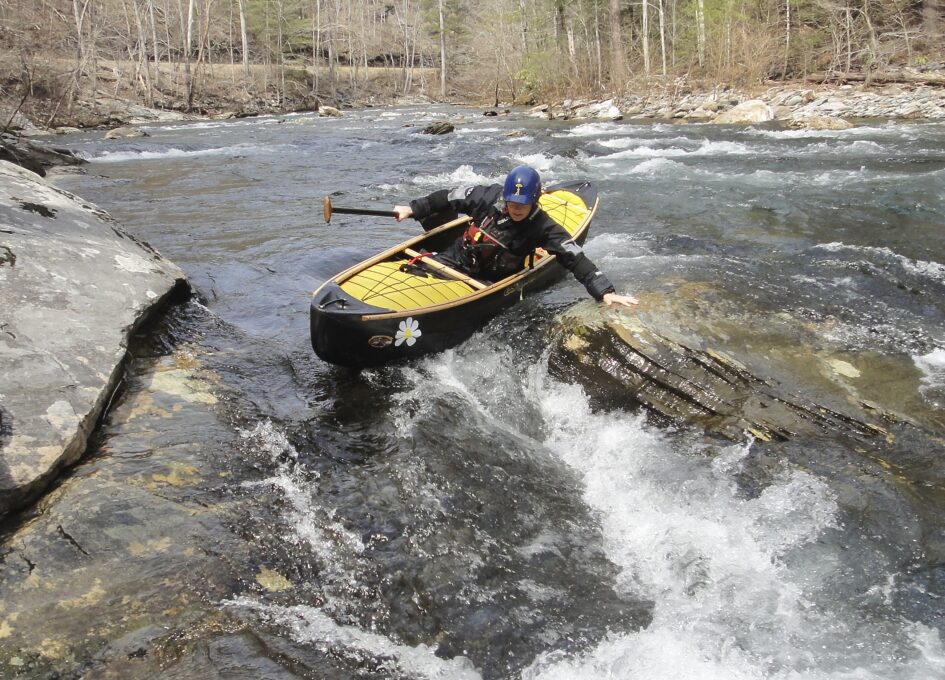
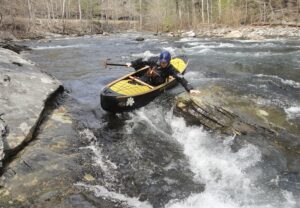
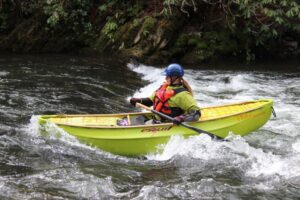
Front surfing is just about the coolest thing you can do in a canoe. Rushing water under the hull, defying the downstream pull of the current, just hovering in one place on the river is a remarkable feeling of speed and boat control.

So how do we choose a wave, get on it, and control our position? Let’s take a look at what makes a good surf wave.

First, a really good wave has to be large enough to hold your canoe. That means the length of the wave and its height must be large enough to cradle your boat so that your canoe will tilt downhill while facing into the current. Think of it this way, your canoe has to slide down the wave at least as fast as the current is rushing past you.

Second, a really good wave has a trough oriented perpendicular to the direction of current flow. This allows you to point your canoe into the approaching current. Everything will feel balanced and the canoe will be easy to steer both left and right for great boat control.

Before getting on a wave, look for doorways to the current. Easier waves have a trough that meets the eddy line at nearly 90 degrees. At this point there will be a depression.  This dip at the eddy line is your doorway to the current. Paddle through and drop on the wave to start surfing.

More challenging waves are further out from your eddy. In this case, your best option is to ferry across the eddy wedge to your doorway.

In some cases the doorway is upstream of the surf wave. Here, surf the shoulder wave out and downstream to the best part of the wave face.

Getting on the wave takes a bit of strategizing. Let’s look at some of the tricks that will get you surfing.

One key to catching a wave is to paddle quickly enough to match the speed of the current you are entering – not too fast, not too slow, just right.

Your position on the wave is important too, place your center of gravity a bit upstream of the crest of the wave.

Controlling boat angle is essential. Opening your canoe’s angle relative to the current will move you in the direction the bow is pointing. To hold steady in a front surf, close your angle to point the bow into the approaching current.

The tough part is knowing how much angle to give your canoe. Generally, use more angle in less powerful current, and vice versa for fast water. Boat design plays a role too, so experiment to find the ideal angle for your canoe, wave and water level.

If using a shoulder wave to catch your ride, you will need to surf along it to reach the sweet spot of the wave. Choose an angle close to 90 degrees to the shoulder wave. As you surf out into the current keep adjusting your canoe angle to match the shape of the wave. Once in the sweet spot, maintain 90 degrees to the trough for a beautiful gliding front surf.

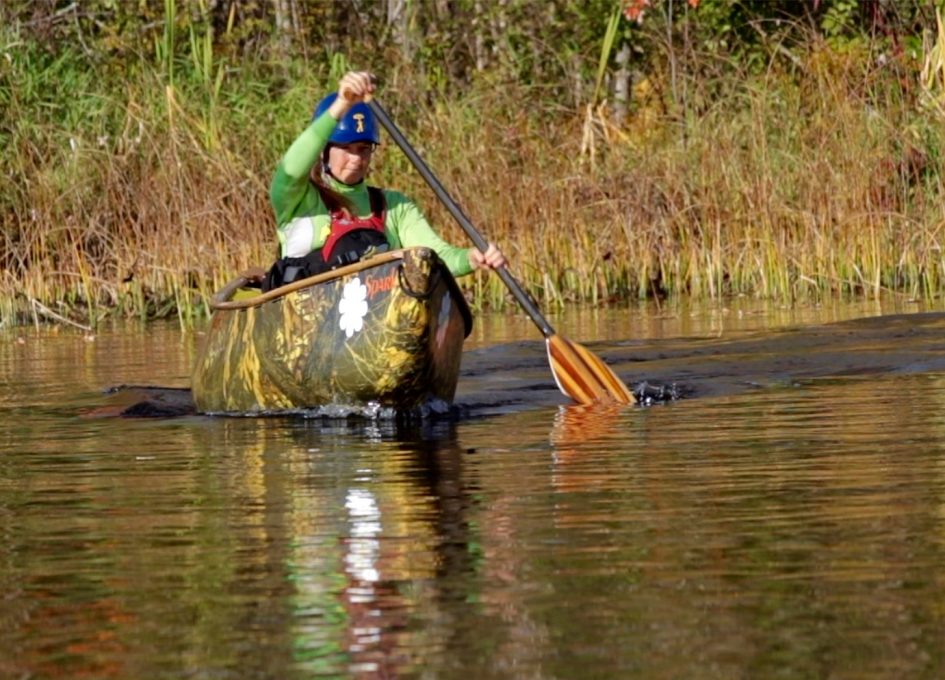
Once on the wave, controlling your left to right movement comes from unique rudder strokes. These strokes are the same for solo and the stern position in tandem.

The rudder is modified by twisting the blade using the T grip. Twisting the blade creates drag which controls both direction and speed.

To turn away from your paddle, twist the T grip outward and push the bottom edge of the power face down while pulling inward against the current.

To turn toward your paddle, twist the T grip inward and push the bottom edge of the non-power face down while pushing outward against the current.

Viewed another way, to rudder away from your paddle, turn the t grip’s thumb toward your shoulder.

Or, you can turn the t grip’s thumb away from your shoulder to rudder toward your paddle.

While ruddering, both your grip hand and shaft hand work together to control the blade. For balance, keep an independent upper body by holding your hands away from the gunwales. Plus, keeping your hands off the gunnel means the stroke won’t interfere with boat tilts.

In tandem, bow paddlers can assist in steering. Often they’ll use the bow cut to direct the canoe toward the bow’s onside. This likely is the more difficult direction to turn for the stern paddler. Cross cuts are often not needed as the stern onside rudder is so effective at steering to the bow’s offside.

Surfing also needs good edge control. Surprisingly, an effective carve requires you to keep your gunnels level as it is the wave face that is tilted beneath you, even when moving left to right. If tilt were added, traction would be reduced leading to weakened boat control.

Your position between crest and trough can be controlled by how you lean your body. Shifting your weight forward drops your bow down to the trough, while leaning back will move you back up to the crest.

In tandem, both partners must coordinate their leans with good communication and a keen awareness of where the canoe is positioned on the face.

Your goal is to keep your center of balance upstream of the crest without unnecessarily plowing your bow into the wave in front of you.

Stroke cadence is important too. Combining forward strokes and lean to approach the trough, or dragging your paddle blade and backward lean to approach the crest.

Some surf waves just beg to be ridden. Problem is, there may not be an easy way to catch them as they are not close to an eddy. One way to catch a ride is to drift backward onto the face and accelerate to match the speed of the current.

Another way is a bit fancier, called a wave turn. Set yourself up sideways to the current and drift into the breaking crest of an inviting surf wave. Make sure just the front half of the canoe strikes the recirculating crest and the stern of your canoe remains in current. Now the wave will spin the canoe to face upstream and into a nice front surf.

As we said earlier, surfing is just about the coolest thing you can do in a canoe. And, we hope you find these tips helpful in making it happen. So find yourself a really great wave and go for a ride.

Check out our video: Front Surfing

Carole and Andrew Westwood

Paddle Canada Instructors / Instructor Trainers

Contact:            info@westwoodoutdoors.ca

 For:                  Moving Water Instructional Courses

                          Custom Courses and Clinics

                        Personal Coaching

Nailing the Canoe Roll!

The Canoe Roll

The paddling season has just finished for most of us. Time to pull out the videos and enjoy viewing the highlights on the river! And you notice that maybe you should practice your roll technique a little more. 

Well luckily pool sessions are likely beginning soon and what an opportunity to practice in a controlled area!

Below is an article on how to execute a canoe roll. Grab a hot beverage of choice and read on….

Having a strong canoe roll increases your confidence to try more challenging moves on the river knowing you can independently recover from a capsize.

The Step and Flipper (Modified Low Brace Roll)

The roll begins with a setup position that protects the body from hazards in the water, followed by a sweeping motion with your paddle during which your legs step up the canoe on its side. The roll is completed with a brace-like stroke called the flipper that pushes the body back into the upright canoe. The following is a break-down of the individual steps.

Set Up

Flipping upside down can be both disorienting, and risky as you might strike the river bottom. A standard set up position ensures you are protected when your world turns upside down.

To set up, tuck forward and place your paddle along the offside of the canoe to protect both you and your blade from being pulled out of position by the current.

As soon as you feel yourself falling into the drink, tuck your paddle along the off-side of the canoe and tuck your body down to the airbag. 

Step

After the set-up, the canoe needs to be tilted, or stepped onto its side.

First, swing your body out perpendicular to the canoe with your paddle skimming the surface of the water. Finish with your shoulders nearly flat on the surface and your paddle parallel to your shoulders

Next, use a leg action similar to stepping up a set of stairs. This stepping motion extends your offside leg and pulls up your onside leg to tilt the canoe on its side.

The key here is to get the canoe on its side, your shoulders flat on the water and paddle held parallel with the shoulders.

Flipper

With the canoe now half way up, use the flipper stroke along with a torso twist to rotate your body over the canoe.

Align the paddle parallel with the shoulders and follow the body movement into the canoe. Begin the stroke with the t grip extended downward, then pull it forcefully upward making the blade act as a strong flipper. This provides resistance against the water to help push you back into the canoe.

Keep your legs locked from the step phase by maintaining knee pressure on your outfitting.

A rigid core locks the upper body and legs.  Crunch the abdominals at the same time as the flipper to bring the body back into the boat. Now, sit upright ready to paddle forward.

Stroke

The final move for the roll is to center yourself over the midline of the canoe ready with a powerful forward stroke for stability. 

Plus, a forward stroke, in addition to adding stability, also moves you where you need to go next.

Offside Roll

The onside roll is just half the story, next let’s look at the offside roll – just in case..

The trick here is to move yourself and your paddle from the offside to the onside while under water. One method is to try and throw yourself to the offside once you know the game is up. Literally throw yourself into the movement and use momentum to carry you beneath the canoe over to your onside, so you can roll up normally.

Sometimes the buoyancy of your lifejacket may put the brakes on the off-side role. If this happens, use your paddle to reach underwater to your onside and scoop to pull yourself around under the canoe

To do a scoop stroke, start the paddle blade pointing at the bow and pull your head around and under the canoe to your onside. Recover the blade by slicing it back to your onside and complete the roll to right the canoe.

Troubleshooting

No one’s roll is 100%, so here are 2 common mistakes to help you troubleshoot a missed roll. 

First, after the flipper you may fall back over. Often, when you perform the flipper your legs relax. If you are not purposely pushing your offside leg away, and lifting with your onside leg, your canoe roll will flop back upside down.

The solution; once the canoe is on its side, lock your core and legs so your body movement continues to right the canoe.

The second common problem is not lowering your grip hand for the flipper stroke. Without it, the stroke has no “push”.

The solution; focus on lowering your grip hand to give you the stroke range to pull up on the handle to develop the propulsion needed to “push” you back into the canoe.

Having a reliable canoe roll is one of the building blocks that opens doors to tackling more challenging moves. 

Click on the link below to view our video on Rolling a Canoe:

Solo Canoe Roll


Hitting Rocks – It’s All About Bouncing in the Right Direction

Creeking Rocks!

Hitting Rocks – It’s All About Bouncing in the Right Direction

By: Andrew and Carole Westwood 

Recently, the thrill of running a steep creek was heightened when I crested a horizon line and looked downstream. Though I would be following a path of mostly water, the best part would be bouncing off a series of rocks, which if all went well, would direct me toward my next eddy.

Running steep, low volume rivers draws on both traditional water reading skills and a host of unique tricks designed to take advantage of the many exposed rocks. Using rocks to guide your canoe through rapids is a common trick used on shallow creek runs. Colliding with rocks may be shunned in deeper rivers, but in creeking, doing so is all part of the game.

A pioneer of many first descents of creeks in the Southern U.S., Dave “Psycho” Simpson coined the phrase that went something like, “It ain’t if you hit a rock or not, it’s if you hit the rock and bounce the right way”. Low flow rocks often are not to be avoided, rather, they are used to assist boat placement. Some of the best lines use a mix of channelized water and boulders to descend a steep run. Besides, rocks offer that quick change in direction that no stroke could ever match.

Hitting rocks can also help to stabilize your canoe.  When fast water piles onto boulders it builds a pillow wave with an upstream seam of descending water.  Getting caught here may pull your paddle deep upsetting your balance, or perhaps cause you to catch your edge. Either way the risk of capsize is increased. Better to cross the seam and aim to hit the rock. Then reach out a hand and grab the rock to reduce the risk of capsize.

Things to remember while developing your rock hitting skills:

  • Lean and tilt into rocks
  • Use your hands to cushion and guide your boat’s path
  • Account for friction after slamming into rocks. You may need to to speed up after impact
  • Strike using the front half of your canoe. A hit past midships can spin you out of control
  • Though not essential, a plastic boat is both the toughest and slipperiest for bouncing off of rocks
  • Elbow pads!

Steep, low flow creeky runs often require hitting rocks. Bouncing the right way is key to holding your line and definitely adds to the excitement of your run.

Andrew  and Carole Westwood are Paddle Canada Moving Water Canoe Instructor Trainers. See Westwoodoutdoors.ca for information on paddling instruction, books, articles and videos.


Hold on! For Boat Control


HOLD ON!   

For Boat Control

To control your canoe, I mean to really control it, you need to hold on to it!

When I watch some canoeists in whitewater, I often wonder how hard they’re trying to hold on to their canoe. I see canoes that wobble side to side, bounce and heal over when striking waves and tilt during forward strokes.

These canoes are “loose”. The boat is not being held by the paddler. In fact the paddler looks and behaves like they’re cargo!

If you were to ask anyone how hard they’re holding on to, say, their paddle – they’d say “damn HARD”.

Ask them how hard they are holding their canoe and you may get a puzzled look.

But, rephrase this to “which piece of gear is most vital to getting you down the river?” and canoe and paddle will likely duke it out for top honors.

So, what’s the point?

Holding on to your canoe is just as important as holding on to your paddle.

Are You A Passenger?

Obviously canoes have a spot for you to sit. So, place your derrière in your boat and that’s the end of it right?

Not so fast, a whitewater canoe comes outfitted with a seat or saddle complete with thigh straps, perhaps knee straps, knee pads, and may even have toe pegs and hip blocks.

But, is strapping yourself in all that it takes to get your craft under control?

Loose Hips – Not if You Want Control

You may have heard the phrase for running rapids, “keep your hips loose”. I always thought this allowed the canoe ride up and over waves.

I was incorrect.

Loose actually works against the job at hand. Better to think “loose hips sink ships” as side to side healing doesn’t use the hull to your advantage. You’ll lose all the design features of a hull if you allow it to rock side to side.

Hold Your Canoe Is to Control your Canoe

Sit down, strap yourself in, lock legs. Hold your canoe with the same intensity as you grip your paddle.

Hold your canoe to steady it during forward strokes – it will be more efficient.

Hold your boat to carve – it will track without skidding.

Grip your canoe going through waves – it will be stable.

Hang on to your canoe while surfing – feel the edge cut across a wave face.

Strategize throughout every maneuver. For example, calculate the ideal tilt during a carve so the edge digs into the water to maintain a perfect arc. Create the tilt with your legs and lock them for the duration of the move.

For every move, think how holding you canoe will improve its performance – AND YOURS!

Push Out, Make a Platform

Picture your points of contact; your butt, knees and feet. And, imagine the canoe as capable of rolling side to side and it’s you who controls it.

Begin by pushing out against the hull using the knee pads (hopefully shaped like cups). This creates a wide, stable, and braced posture. Then, tense your calves and quads to lock your legs, and put pressure on your feet. Now you have a wide platform to connect you to the canoe.

Equally tension the legs to hold the canoe flat. Great for straight ahead efficiency and surfing across waves.

For carves or wave blocks, tilt the canoe by coordinating both legs. Lifting one leg against the straps while pushing the other down, tilts the canoe. Lock your legs to freeze this positon and hold it for as long as necessary to complete a maneuver.  

Get a Grip – On Your Canoe

Paddling well, really well, requires that you paddle in control.

Choose a route, plan the moves to get through water features, then hang on, literally, and do it.

Tighten the muscles in your legs against the outfitting and hold the canoe strategically every step of the way. Tilt it on a carve, hold it flat on a straightaway, edge across a wave, wave block a haystack.

Boat control will give you a performance boost so… Hold On

Check out our videos here.

Carole and Andrew Westwood

Paddle Canada Instructors / Instructor Trainers

Esquif Canoe Ambassadors

Contact:        info@westwoodoutdoors.ca

For:                Moving Water Instructional Courses

                        Custom Courses and Clinics

                         Personal Coaching


Solo Canoeing: Stroke Effort – How Much is Too Much?

Solo Canoeing: Stroke Effort – How Much is Too Much?

No other stroke is as versatile, nor as complex, as the forward stroke. Mastery comes with understanding the vast capabilities of this stroke, the subtleties of its use and the hull speed characteristics of your canoe. In this article I’ll discuss how to move forward with just the right amount of effort so you’ll feel less tired and more in control.

When discussing effort, I’m going to express this as a percentage – 100% for maximum effort, 10% for minimal effort etc. Your level of maximum exertion may be different than mine, but most paddlers can only do 100% for one or two strokes – unless they’re an Olympic C1 slalom athlete!

So how hard do you paddle? How hard should you paddle? Spoiler Alert – for myself, the majority of the time I only paddle at about 30% effort. 

90 – 100%: Hip Thrust

I do this effort very rarely. Let’s say you want to get up and go from a tiny eddy pool with little space to accelerate. Using a Hip Thrust forward stroke with 100% effort will break the suction seal around the hull of the canoe and launch it out into current. The high level of effort with this style of forward stroke is appropriate for the task and the limited space to accelerate.  

Though strong, the hip thrust is actually rather slow and only used once or twice. To further accelerate the canoe you’ll need to shift gears to a faster forward stroke. Often a carving stroke (see 0-60%: Carving below) is selected for completing a maneuver.

Note that a short canoe is slower by nature and may only need one hip thrust to get it past first gear. Too many thrusts may cause the boat to bob and can actually limit your speed, and /or cause veering. Longer canoes weigh more, have more resistance and could likely use two, three, maybe more thrust strokes.

60 – 90%: Rotation

I use this range of effort a bit more often, but not a lot. Picture an extended ferry move across fast water without even a surf wave to help. Sustaining 70 or even 80% of your maximum effort for up to a dozen strokes would definitely be a workout, but doable. It consumes a lot of fuel and makes us tired, so use it sparingly saving it for special cases. 

The advantage of rotating the torso and using your strong abdominal muscles to propel the canoe can certainly provide a strength advantage over arm muscles alone. Some may even include a top arm punch to increase mechanical advantage. 

Be aware that using this much power will cause the canoe to veer if it is not set up on a carving arc first. Without the guidance of a bow wave, you will be forced into using corrective stern pry strokes whose friction will significantly drop your efficiency and likely kill the move.

Often overlooked with torso rotation is body size. If your canoe is wide and your arms short, you may find you can’t rotate enough before the canoe interferes with your reach. This restricted reach places the power of the stroke closer to the pivot point of the boat. Shorter paddlers need to be aware that this position will often cause veering, and thus can be a real hindrance to realizing the advantage of rotation.

0 – 60%: Carving 

Ok, 0 – 60% is a big range for sure, but this is where I’ll make a case for paddling at just 30% most of the time. At 30% you won’t get tired, you will have maximum control over your canoe, and you will look as if you are going magically fast for such little effort.

Carving forward strokes rely on arm muscles to move the canoe. Your core and legs are engaged to support your body and hold the boat, but other than that it’s mostly your arms doing the work. 30% represents a comfortable midpoint in your power range. You can add as much as 30% more or take away 30% giving a range of 0 – 60%.

A typical scenario might be starting in an eddy with a couple of boat lengths of runway ahead of you. Then use a carving start and accelerate at about 40% effort. After about a half dozen strokes you should be on a comfortable carve and arcing towards your next destination, or transition point for a new arc. At this point decrease your effort to 30% to allow the bow waves to preserve the arc.

An added benefit of a relaxed stroke rate is you will feel the canoe glide between strokes!

Now if you did need to straighten a little bit, increase your effort in the range of 30 – 60% to push the bow wave into a wider arc. After this brief effort, return to 30% for cruising speed. To tighten the arc, you can reduce your force, or even pause the stroke entirely, letting the canoe glide with 0% effort – pretty sweet!

I paddle at 30% all the time. I only use my smaller arm muscles which saves fuel and effort. My arms articulate all the movements for a carving stroke using the acronym CAPT; Cadence, Angle, Position, Tilt to help control the arcing path of the canoe. (see video:  Carving Using 2X4  )

Effect of the Hull on Speed

Step back and think of the shape of the canoe. It’s perfectly streamlined and super-efficient in the water. Once it’s moving, the canoe only needs a tiny bit of power to keep it cruising at its natural hull speed. And, here is the big take away – unless absolutely necessary, avoid paddling faster than the canoe’s natural hull speed.

Curiously, the hull speed of your canoe may not be as high as you might think. Each boat design is different. If you are constantly trying to push the canoe beyond its hull speed you are working too hard and probably not going much faster for the added effort. 

When a canoe is held at its optimal hull speed the paddler appears to be hardly working at all. Everything is at equilibrium; speed, bow waves, arc and effort. 30% effort is all you likely need. The canoe will feel and appear to be gliding.

Push the canoe too hard and a paddler must overuse correction strokes to reach their target. The “surge forward and drop back” pattern of speeding up with too much speed and slowing with friction strokes disrupts a smooth cruising canoe. It makes paddling look like work, it feels like work, and is just plain tiring.

So, How Much is Enough?

It varies. Although I can paddle hard when I need to, I rarely have to. And, even though I am pretty good at torso rotation, I don’t over use this skill either as it is often overkill for my canoe’s natural hull speed. Carving using easy forward strokes that work in harmony with my canoe’s shape, arcs and bow waves requires paddling at +/- 30% the majority of the time. 

Strategic use of the different types of forward strokes can save you energy, prevent overuse injuries, accommodate smaller paddlers, and best of all, have you paddling effortlessly like the pros!

Check out our videos here.

Carole and Andrew Westwood

Paddle Canada Instructors / Instructor Trainers

Esquif Canoe Ambassadors

Contact:        info@westwoodoutdoors.ca

For:               Moving Water Instructional Courses

                        Custom Courses and Clinics

                         Personal Coaching


Secrets of Great Paddling

    
Secrets of Great Paddling

How do you define an exceptional paddler? What makes them look so good? Do you think that you can do what they do? 

Well, I think you can, and I’m going to share some of the secrets to becoming a really good canoeist.

And, some of these ideas may surprise you as they’re really easy to do.


Paddling Greats

First, watch video clips of some of your favorite canoeists. A few that I think look really outstanding are Bill Mason, Mark Scriver, Eli Helbert John Kazimierczyk, and also, my wife Carole Westwood. You’ll see something in common – a coordinated union of paddler, canoe and paddle. Everything just fits together. But, why does it look this way?

I think a great canoeist moves with a degree of grace that makes them appear to paddle with remarkable ease. In fact, at times they look to be moving very fast despite their relaxed pace. Second, their strokes appear smooth and in synch with the whole river environment. And finally, the canoe moves as if it’s an extension of the paddler themselves.


Invisible Skills that are Key to Greatness

  1. Hold your boat

This idea is so simple it’s often missed in our attempt to paddle well. Great paddlers actively hold on to their canoe via their feet, knees, legs, hips and back side (or sit upon, butt, etc.) using the outfitting in the boat.

Avoid at all costs just sitting like a passenger in your canoe – instead work to grip it, control it, guide it, but don’t just sit in it. Try to “push” your knees to the chine of the hull and keep them there, to actively hold the canoe.

Holding your canoe will make it stable. Watch out for side to side wobbles, and bow and stern bobbing. These are signs of a loose boat.

Gunnels should appear steady and nearly level when going straight, and held tilted throughout carves. The ends of the canoe should remain flat, not bouncing up and down.

The boat held securely will glide better when held flat, and carve better when held on a tilt.


  1. Paddle a quiet boat

Part literal, part metaphor, paddling a quiet boat is indeed quieter to the ear, but it is also “quieter” to the eye as well.

When a canoe is pushed too fast by your stroke, say during a turn or just to accelerate from rest, you will hear splashing from the paddle and gurgles from the hull. Forcing the canoe into a movement causes unnecessary splashes and aerated water. The aesthetics are visually harsh too. These sounds and visual clues also indicate a loss of energy.

Great paddlers temper their strokes to move the canoe in a way that matches the canoe’s natural rhythm on the water. Think of the story of the “Three Bears” as an analogy, paddle “not too fast, not too slow, paddle just right”.

Knowing how fast your canoe can accelerate or change direction, and not forcing it beyond its designed ability, will improve your efficiency and make you look in tune with your craft. 


  1. Carve with Forward Strokes

Using the forward stroke to carve is easy. Consider that much of white-water paddling uses arcing paths. Because of this I avoid straight ahead paddling in favour of gently arcing when travelling in my solo canoe. But here’s the catch, while I’m on a carve I can steer by adjusting the speed of my forward stroke.

To straighten my route I speed up the forward stroke, likewise to tighten the arc, I slow my stroke down.

Avoiding friction strokes like the stern pry helps keep momentum constant; neither surging ahead, nor braking under the drag of a pry stroke.

Paddlers who use mostly forward strokes look smooth and effortless.


  1. Glide

It goes without saying, canoes are streamlined. So, take advantage of the canoe’s shape and glide more often.

I sometimes see paddlers using too many forward strokes as if they’re stroking to some unheard drum beat. Driving a canoe too hard causes it to veer off course. You can see this when paddlers use frequent correction strokes to bring it back on course. It’s called a correction stroke for a reason – hint hint.

Heighten your awareness of every stroke, place it precisely every time to suit the maneuver. Avoid hitting “autopilot” and just stroking for the heck of it.

Instead, feel the glide of the hull and add power precisely when you need it.


Be a Great Paddler

Incorporating the above ideas will help you become a great looking paddler. Using the canoe and paddle strategically will allow you too, to move in harmony. Just like other great canoeists

Check out our videos here.

Carole and Andrew Westwood

Paddle Canada Instructors / Instructor Trainers

Esquif Canoe Ambassadors

Contact:        info@westwoodoutdoors.ca

For:                Moving Water Instructional Courses

                        Custom Courses and Clinics

                         Personal Coaching


Video on rolling a Solo Canoe

This video describes the solo open canoe roll. It details the steps to the onside roll, modifications needed for the offside roll, plus, it provides some common trouble shooting tips. This version of the canoe roll introduces the concept of “Step and Flipper” as modification to the traditional low brace roll which paddlers have found gets them over the hump of developing a reliable solo canoe roll.
Happy Summer!